Chocolate Cake Pops
Introduction
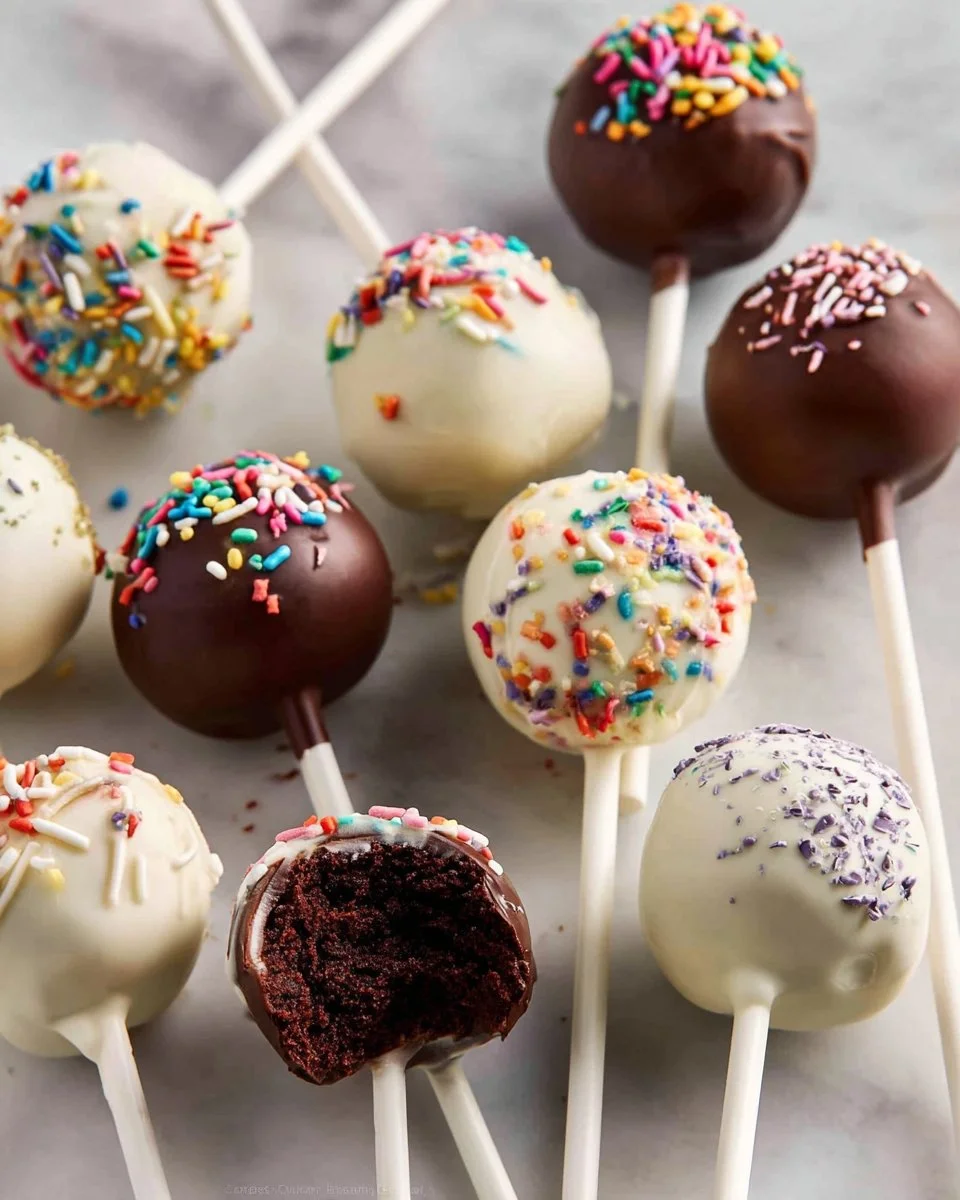
Chocolate Cake Pops are little bites of chocolate joy, perfect for parties, after-school snacks, or a fun weeknight baking project. These pops combine tender chocolate cake crumbs with a creamy cocoa butter frosting, rolled into bite-sized balls and coated in glossy candy melts or melted semi-sweet chocolate. Expect a moist, soft interior with a rich chocolate aroma and a satisfying snap from the outer coating. The texture is decadent but playful, with the smooth frosting binding the crumbs into a uniform, rollable mixture. They shine at birthdays, bake sales, or when you want an elegant yet simple dessert to share. If you love fudgy chocolate desserts, you might also enjoy the rich layers found in the best chocolate Texas sheet cake, which shares that same deep chocolate comfort.
Ingredients
- 1 cup all-purpose flour, for structure and tender crumb.
- 1 cup granulated sugar, for sweetness and texture.
- 6 Tablespoons unsweetened natural cocoa powder, for deep chocolate flavor in the cake.
- 1/2 teaspoon baking soda, to help the cake rise lightly.
- 1/4 teaspoon salt, to balance sweetness and enhance chocolate notes.
- 1/2 cup canola oil or melted coconut oil, for moistness; use the coconut oil option if you prefer a subtle coconut note.
- 2 large eggs, to bind the batter and add richness.
- 1 teaspoon pure vanilla extract, for warmth and aroma.
- 1/2 cup hot water, to bloom the cocoa and thin the batter for a moist cake.
- 6 Tablespoons unsalted butter, softened, for the frosting base and creaminess.
- 3/4 cup confectioners’ sugar, to sweeten and thicken the frosting.
- 1/2 cup unsweetened cocoa powder, for chocolate flavor in the frosting.
- 2-3 teaspoons heavy cream or milk, to loosen the frosting to a spreadable consistency.
- 24 ounces candy melts or semi-sweet chocolate bars, for the outer coating; choose candy melts for bright colors or chocolate bars for richer taste.
- Sprinkles, for decoration and a festive finish.
Step-by-Step Instructions
- Preheat the oven to 350°F (177°C) and grease a 9-inch pan. A light coating of oil or nonstick spray works well.
- In a large bowl, whisk together the flour, sugar, cocoa powder, baking soda, and salt until well combined. Make sure there are no lumps of cocoa powder.
- In another bowl, whisk together the oil, eggs, and vanilla extract until smooth and uniform.
- Combine the wet ingredients with the dry ingredients, then add the hot water and mix until smooth. The batter will be thin, which yields a moist cake. Tip: hot water helps bloom the cocoa for richer flavor.
- Pour the batter into the prepared pan and bake for 25-27 minutes, or until a toothpick inserted in the center comes out clean. Avoid overbaking to keep the cake moist.
- Allow the cake to cool in the pan for about 10 minutes, then transfer it to a wire rack to cool completely. Cooling fully is important before crumbling.
- For the frosting, beat the unsalted butter until creamy. Gradually add the confectioners’ sugar, cocoa powder, milk, and vanilla extract, beating until smooth. Adjust the 2-3 teaspoons of cream or milk to reach a spreadable, pipeable thickness.
- Once the cake is completely cooled, crumble it into a large bowl, then mix in the frosting until well combined. The mixture should hold together when pressed.
- Roll the mixture into small balls (about 1 inch in diameter) and chill in the refrigerator for 2 hours. Chilling firms the balls so they dip cleanly. For a variation in size, you can make slightly larger or smaller balls, but adjust chilling time if needed. See a related simple chocolate treat for inspiration at Chocolate Bliss dump cake.
- Melt the candy melts or chocolate bars according to package instructions. Dip each cake ball in the melted coating, letting excess drip off, and then decorate with sprinkles. Let the coated cake pops set before serving. For tips on melting techniques, you might also reference a different chocolate variation at chocolate caramel dump cake.
Recipe Details
- Prep Time: 25 minutes active, plus 2 hours chilling
- Cook Time: 25-27 minutes
- Total Time: about 3 hours (includes chilling time)
- Servings: about 24 cake pops
- Calories: approximately 290 calories per cake pop
Tips, Storage & Variations
- Tips: Use a small cookie scoop or teaspoon to portion even balls. Chill thoroughly before dipping to prevent the balls from falling apart in the coating. If coating gets too thick while working, gently reheat in short bursts.
- Storage: Store cake pops in an airtight container at room temperature for up to 2 days. Refrigerate for up to 5 days, but bring to room temperature before serving for best texture.
- Freezing: Freeze uncoated cake balls in a single layer on a baking sheet until solid, then transfer to a freezer bag for up to 2 months. Thaw in the refrigerator before dipping.
- Flavor variations using existing ingredients only:
- Use melted coconut oil instead of canola oil for a subtle coconut undertone.
- Swap candy melts for semi-sweet chocolate bars for a deeper chocolate coating.
- Use the higher end of the 2-3 teaspoons of heavy cream for a richer frosting texture. For other chocolate dessert ideas, explore this chocolate caramel dump cake variation.

FAQ
-
How long do cake pops last?
Store at room temperature for up to 2 days or refrigerated up to 5 days in an airtight container. -
Can I make the cake ahead of time?
Yes, bake the cake up to 2 days ahead, crumble, mix with frosting, and chill the balls before coating. -
Why did my cake pops fall off the stick?
If the center is too soft, chill the balls longer before dipping, and dip only partway into the coating to create a solid anchor. -
Can I use store-bought frosting instead?
Yes, store-bought frosting can be used in place of the homemade frosting, but adjust quantity so the mixture binds without becoming too sweet. -
Do I need candy melts?
No, you can use 24 ounces of melted semi-sweet chocolate bars instead for a richer coating. -
How do I fix cracked coating?
Warm the coated pops briefly in a low oven or microwave very briefly and smooth with a small spoon while the coating is still pliable.
People Also Ask
-
What size cake ball should I roll for cake pops?
Aim for about 1 inch in diameter for consistent cooking and portion control. -
Can I use a different pan size for the cake?
Yes, you can use a similar volume pan, but adjust baking time if your pan is significantly deeper or shallower. -
Is it better to use candy melts or chocolate bars?
Candy melts are easier to color and set quickly, while chocolate bars give a richer flavor. -
Can I skip chilling the cake balls?
Chilling is recommended to firm the balls and prevent them from falling apart during dipping. -
How do I melt chocolate without burning it?
Melt in short bursts in the microwave, stirring between each burst, or use a double boiler over simmering water. -
Can I add mix-ins like chopped nuts?
Mix-ins are possible if they do not make the mixture too loose, but for best results keep the texture uniform. For a fruit-forward idea, see this chocolate cherry idea at chocolate cherry cake.
Conclusion
I hope you enjoy making these Chocolate Cake Pops and sharing them with friends and family. For a step-by-step video and another reliable method, you can compare techniques with the detailed Chocolate Cake Pops (Recipe + Video) – Sally’s Baking Addiction guide. If you want a different take or inspiration from another creator, check out the Chocolate Cake Pops – Girl Versus Dough version for ideas on coatings and decorations. Happy baking, and enjoy every chocolatey bite.
Chocolate Cake Pops

Delicious chocolate cake pops made with tender chocolate cake crumbs, creamy cocoa butter frosting, and coated in candy melts or melted chocolate. Perfect for parties and celebrations.
- Prep Time: 25 minutes
- Cook Time: 27 minutes
- Total Time: 180 minutes
- Yield: 24 cake pops 1x
- Category: Dessert
- Method: Baking
- Cuisine: American
- Diet: Vegetarian
Ingredients
- 1 cup all-purpose flour
- 1 cup granulated sugar
- 6 tablespoons unsweetened natural cocoa powder
- 1/2 teaspoon baking soda
- 1/4 teaspoon salt
- 1/2 cup canola oil or melted coconut oil
- 2 large eggs
- 1 teaspoon pure vanilla extract
- 1/2 cup hot water
- 6 tablespoons unsalted butter, softened
- 3/4 cup confectioners’ sugar
- 1/2 cup unsweetened cocoa powder
- 2–3 teaspoons heavy cream or milk
- 24 ounces candy melts or semi-sweet chocolate bars
- Sprinkles for decoration
Instructions
- Preheat the oven to 350°F (177°C) and grease a 9-inch pan.
- Whisk together the flour, sugar, cocoa powder, baking soda, and salt.
- In another bowl, whisk together the oil, eggs, and vanilla extract.
- Combine the wet and dry ingredients, then add hot water and mix until smooth.
- Pour the batter into the prepared pan and bake for 25-27 minutes.
- Allow the cake to cool in the pan for about 10 minutes, then transfer to a wire rack.
- Beat the unsalted butter until creamy, then gradually add confectioners’ sugar and cocoa powder.
- Once the cake is cooled, crumble it into a bowl and mix in the frosting.
- Roll the mixture into small balls (about 1 inch in diameter) and chill in the refrigerator for 2 hours.
- Melt the candy melts or chocolate bars according to package instructions.
- Dip each cake ball in the melted coating and decorate with sprinkles.
Notes
Use a small cookie scoop for portioning cake balls, and chill thoroughly before dipping to prevent them from falling apart. Store in an airtight container at room temperature for up to 2 days.
Nutrition
- Serving Size: 1 cake pop
- Calories: 290
- Sugar: 18g
- Sodium: 200mg
- Fat: 12g
- Saturated Fat: 6g
- Unsaturated Fat: 4g
- Trans Fat: 0g
- Carbohydrates: 40g
- Fiber: 2g
- Protein: 3g
- Cholesterol: 30mg