

Santa’s No-Bake Sugar Cookie Bars: A Sweet Holiday Treat
With the holiday season around the corner, nothing brings warmth and cheer to the home like a delightful dessert. Enter Santa’s No-Bake Sugar Cookie Bars—a festive twist on traditional sugar cookies that combines velvety sweetness with delectable creaminess. The rich aroma of butter and vanilla fills your kitchen, inviting everyone to come and celebrate as you prepare these beautiful bars. The soft, creamy texture of the bars melts in your mouth while the slight crunch from the festive sprinkles adds a playful contrast. Perfect for cozy weeknights or large gatherings, this effortless recipe is both a crowd-pleaser and a family favorite. So, gather around, roll up your sleeves, and join me in making these delightful treats that are sure to impress!
A Closer Look at Santa’s No-Bake Sugar Cookie Bars
Santa’s No-Bake Sugar Cookie Bars are a delightful cross between classic sugar cookies and decadent dessert bars. Traditionally, sugar cookies are known for their buttery, sweet flavor and slightly crisp edges, but these no-bake bars elevate the experience. The inspiration for this treat stems from the desire to create a fuss-free version of festive cookies that you can whip up without turning on the oven. This makes them especially convenient for busy families during the holidays.
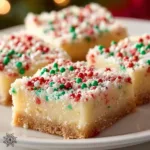
What’s striking about Santa’s No-Bake Sugar Cookie Bars is not just how easy they are to prepare but also how well they hold their shape while maintaining a lovely rich flavor. Since they are chilled rather than baked, they develop a creamy, almost cheesecake-like texture that sets beautifully in the refrigerator. These bars are typically served as a holiday dessert or a sweet snack to share with family and friends throughout the festive season. Each delightful slice is adorned with colorful sprinkles, adding a touch of magic and cheer to your get-together, making them a perfect offering for Santa himself!
Why You’ll Love This No-Bake Recipe
This delicious recipe simplifies your holiday baking without compromising on flavor or fun. Here’s why you’ll love making Santa’s No-Bake Sugar Cookie Bars:
- Ease of preparation: With no baking involved, even novice bakers can make these delicious treats without any fear of oven mishaps!
- Flavor complexity: The combination of buttery sweetness and a hint of vanilla creates a flavor profile that rivals any traditional baked cookie.
- Family-friendly or kid-approved: Kids will adore their fun colors and creamy texture, making dessert time exciting and enjoyable.
- Budget-friendly or ingredient flexibility: Most ingredients are pantry staples, and you can easily swap items based on dietary needs without losing taste or texture.
Let’s Cook Santa’s No-Bake Sugar Cookie Bars at Home
Creating these bars is a straightforward process that combines mixing, chilling, and slicing. You won’t need any fancy equipment, just a mixing bowl, a spatula, and an 8×8-inch baking dish lined with parchment paper. This festive treat is ready in about 20 minutes of prep time, then let the fridge do the rest of the work.
Ingredients
- 1 ½ cups all-purpose flour: Acts as the base for the cookies; for a gluten-free option, substitute with almond or coconut flour.
- ½ cup unsalted butter, softened: Adds richness and a creamy texture to the bars.
- ½ cup granulated sugar: Sweetens the bars, giving that iconic sugar cookie flavor.
- 1 teaspoon vanilla extract: Brings warmth and enhances the sweetness.
- 1 cup powdered sugar: Provides the necessary sweetness and smooth texture as you mix.
- ⅓ cup milk: Helps bring the mixture together while also keeping it moist.
- Sprinkles for decoration: Adds a festive touch; use holiday-themed colors or edible glitter!
Directions
- Prepare Your Dish: Line an 8×8-inch baking dish with parchment paper, allowing enough to hang over the edges for easy removal later.
- Mix the Base: In a medium bowl, combine the softened butter and granulated sugar. Use a spatula or hand mixer to cream them together until fluffy and light, which should take about 1-2 minutes.
- Add the Dry Ingredients: Gradually stir in the all-purpose flour, followed by the powdered sugar, until everything is well-combined. The mixture will start to clump together.
- Incorporate Milk and Vanilla: Pour the vanilla extract into the mixture and add the milk. Mix until the ingredients create a smooth and cohesive dough.
- Layer in the Baking Dish: Pour the mixture into the prepared baking dish, using your spatula to spread it out evenly. Press firmly to ensure it’s compact and levels out nicely.
- Sprinkle Delight: Before chilling, generously top with festive sprinkles. This will infuse the bars with color and make them visually appealing.
- Chill and Set: Cover the dish with plastic wrap and refrigerate for at least 2 hours, allowing the bars to firm up. Once set, lift the bars out using the parchment paper and cut them into squares.
What to Serve With Santa’s No-Bake Sugar Cookie Bars
When it comes to serving Santa’s No-Bake Sugar Cookie Bars, there are plenty of delightful pairings to elevate your dessert experience. A warm cup of spiced apple cider complements the sweetness of the bars and adds a cozy flavor contrast. Alternatively, a rich hot chocolate topped with whipped cream works beautifully alongside your cookie bars for an indulgent treat. For a refreshing twist, serve them with a scoop of vanilla ice cream, allowing the creamy coldness to balance the sweetness of the sugar cookie bars.
- Spiced Apple Cider: The warm spices enhance the bars’ holiday vibes, creating a comforting pairing.
- Rich Hot Chocolate: The creamy drink adds a decadent touch to your dessert experience.
- Vanilla Ice Cream: The cold and creamy ice cream cuts through the sweetness, providing a perfect texture contrast.
Top Tips for Perfecting Santa’s No-Bake Sugar Cookie Bars
Getting these bars just right is all about following some simple techniques. Here are some chef-approved tips to ensure your Santa’s No-Bake Sugar Cookie Bars turn out perfectly every time:
- Ingredient swaps or upgrades: For a dairy-free version, use coconut cream in place of milk and vegan butter instead of regular butter.
- Spice adjustments: Consider adding a pinch of nutmeg or cinnamon for a warm spice note that enhances the holiday spirit.
- Equipment advice: A hand mixer helps achieve the best creaminess when blending butter and sugar, though a spatula works too!
- Storage tips: Keep the bars in an airtight container in the fridge for up to one week, ensuring they stay fresh.
- Mistakes to avoid: Make sure the butter is at room temperature; cold butter can lead to clumpy mixtures that don’t bind well.
Variations & Add-Ins
Though Santa’s No-Bake Sugar Cookie Bars are delightful on their own, you can take them to the next level with a few variations. Consider adding crushed peppermint candies for a festive crunch or swirling in chocolate chips for a delightful burst of chocolate. For a different flavor twist, use almond extract instead of vanilla for a deliciously nutty flavor. If you’re in the mood for a healthy option, try incorporating some finely chopped nuts or dried fruits to the mixture.
Kid-Friendly Version
Making this recipe even more kid-friendly is a breeze! Get your little ones involved by allowing them to mix, sprinkle, and even choose different toppings like mini chocolates or colorful candy-coated chocolates. You can also guide them to slice the bars into fun shapes using cookie cutters after chilling. The colorful sprinkles and perhaps themed toppings from their favorite shows or movies create excitement during dessert time!
Storing and Reheating Tips
To keep your Santa’s No-Bake Sugar Cookie Bars fresh and delicious, store them in the refrigerator in an airtight container. They can last for up to one week, but it’s unlikely they’ll last that long—everyone loves these bars! If you want to keep them longer, consider wrapping individual bars in plastic wrap and placing them into a freezer-safe container. This way, you can thaw and enjoy them as needed!
When it comes to reheating, remember these bars are best enjoyed straight from the fridge, but if you prefer them slightly warm, pop them in the microwave for about 10-15 seconds. Alternatively, you can thaw frozen bars in the refrigerator overnight for a softer texture. Just be cautious not to over-reheat them, as no-bake treats tend to lose their delightful consistency.
FAQs
Can I prepare Santa’s No-Bake Sugar Cookie Bars ahead of time?
Absolutely! These bars can be made 1-2 days in advance. Just store them in the refrigerator until you’re ready to serve.
What substitutions can I make for dairy ingredients in this recipe?
You can swap out the butter for vegan butter and use nut or oat milk in place of regular milk for a dairy-free alternative.
How can I make this recipe gluten-free?
Simply replace the all-purpose flour with a gluten-free flour blend to keep the texture similar.
How long will these bars keep?
When stored in an airtight container in the fridge, these bars should last up to a week. For longer storage, freeze them as mentioned!
Can I customize the flavors?
Definitely! Try adding different extracts, mix-ins like chocolate chips or nuts, or adjust the toppings to suit your family’s preferences.
Conclusion
There you have it—an easy and enchanting recipe for Santa’s No-Bake Sugar Cookie Bars that captures the essence of the season. With their creamy texture, delightful sweetness, and festive colors, these bars are bound to make any gathering a little sweeter and more enjoyable. Perfect for busy weeknights or parties, this recipe is simplicity at its best. Spread joy this holiday season with a plate full of these delightful treats—try it tonight and let me know how it turned out!

Santa’s No-Bake Sugar Cookie Bars
A delightful no-bake version of sugar cookies that combines creamy sweetness with festive sprinkles, perfect for the holiday season.
- Prep Time: 20 minutes
- Cook Time: 0 minutes
- Total Time: 120 minutes
- Yield: 16 servings 1x
- Category: Dessert
- Method: No-Bake
- Cuisine: American
- Diet: Vegetarian
Ingredients
- 1 ½ cups all-purpose flour
- ½ cup unsalted butter, softened
- ½ cup granulated sugar
- 1 teaspoon vanilla extract
- 1 cup powdered sugar
- ⅓ cup milk
- Sprinkles for decoration
Instructions
- Line an 8×8-inch baking dish with parchment paper.
- In a medium bowl, cream together softened butter and granulated sugar until fluffy.
- Stir in all-purpose flour and powdered sugar until combined.
- Add vanilla extract and milk, mixing until smooth.
- Pour the mixture into the prepared baking dish, spreading it evenly and pressing firmly.
- Top generously with festive sprinkles.
- Cover with plastic wrap and refrigerate for at least 2 hours.
- Lift the bars out using the parchment paper and cut into squares.
Notes
For a dairy-free version, substitute coconut cream for milk and vegan butter for regular butter.
Nutrition
- Serving Size: 1 square
- Calories: 250
- Sugar: 10g
- Sodium: 90mg
- Fat: 12g
- Saturated Fat: 7g
- Unsaturated Fat: 5g
- Trans Fat: 0g
- Carbohydrates: 30g
- Fiber: 1g
- Protein: 2g
- Cholesterol: 15mg
