If you’re looking for a delightful dessert that brings the joy of childhood back with a sophisticated twist, you’re in for a treat with Rice Krispie Treat Cheesecake! This easy-to-make, no-bake cheesecake blends the gooey, crunchy goodness of Rice Krispie treats with a rich, creamy cheesecake filling. It’s a dessert that not only looks incredible but also tastes absolutely divine—perfect for family gatherings or a cozy night in. So grab your mixing bowls and get ready to create a dessert that will have everyone asking for seconds!
What Is Rice Krispie Treat Cheesecake?
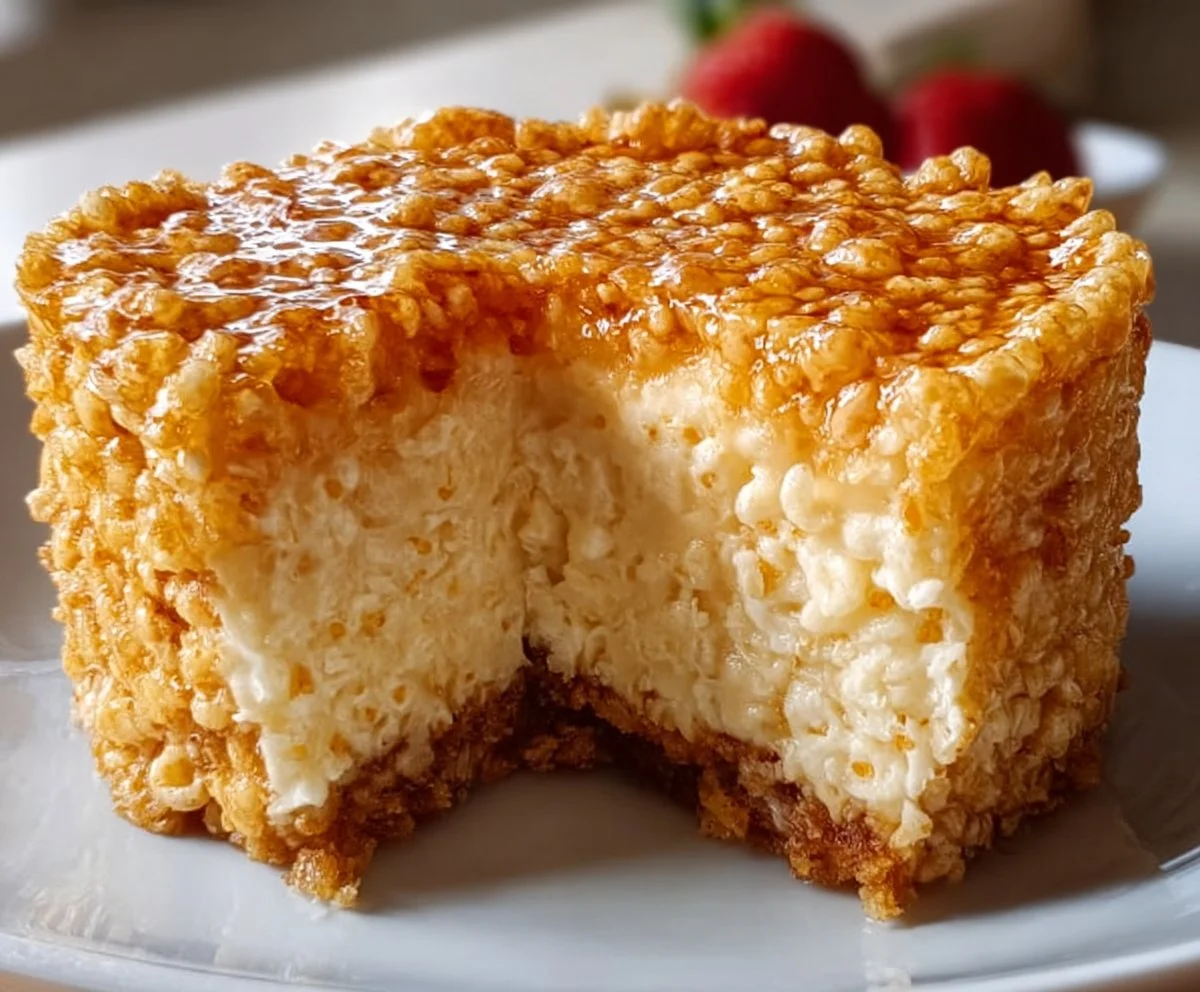
Rice Krispie Treat Cheesecake is a fun fusion of two beloved treats: the nostalgic Rice Krispie treats and the classic cheesecake. This version is special because it combines the crispy texture of the Rice Krispies with a velvety, indulgent cheesecake filling, all topped with a sweet marshmallow drizzle. It’s an excellent dessert for any occasion, whether it’s a holiday gathering or simply a family dessert night. The no-bake aspect makes it incredibly convenient, allowing you to set it and forget it!
Why You’ll Love This Rice Krispie Treat Cheesecake
- Convenience: Easy to prepare and requires little hands-on time.
- Flavorful: A perfect blend of sweet, creamy, and crunchy.
- Customizable: Top with your favorite chocolates, fruits, or sprinkles for a personal touch.
- Budget-Friendly: Simple ingredients that won’t break the bank.
- Family-Friendly: A dessert that kids and adults alike will adore.
How to Make Rice Krispie Treat Cheesecake
Quick Overview
This Rice Krispie Treat Cheesecake is a simple, no-bake dessert that combines the classic taste of marshmallow Rice Krispie treats with a creamy cheesecake filling. Perfect for parties or a sweet family dessert, it’s as easy as mixing, molding, and chilling!
Ingredients
- 2 cups Rice Krispies – the star of the treat, giving that signature crunch.
- 1 cup mini marshmallows – for a gooey, sweet texture.
- ½ cup unsalted butter – helps bind the Rice Krispies together.
- 16 oz cream cheese – the creamy base for the cheesecake.
- 1 cup powdered sugar – adds sweetness to the cheesecake.
- 1 tsp vanilla extract – enhances the flavor.
- 1 cup whipped cream – for a light, airy texture to balance the richness.
Directions
-
Make the Rice Krispie Base:
In a saucepan over low heat, melt the butter. Once melted, add the mini marshmallows and stir until completely melted and smooth. Remove from heat and mix in the Rice Krispies until well coated. -
Press into the Pan:
Lightly grease a 9-inch springform pan. Pour the Rice Krispie mixture into the pan and press down evenly using a spatula or your hands. Set aside to cool. -
Prepare the Cheesecake Filling:
In a mixing bowl, beat the cream cheese until smooth. Gradually add the powdered sugar and continue mixing until combined. Stir in the vanilla extract. -
Fold in the Whipped Cream:
Gently fold the whipped cream into the cream cheese mixture until just combined. -
Assemble the Cheesecake:
Pour the cheesecake filling over the cooled Rice Krispie base, smoothing the top with a spatula. -
Chill:
Cover the cheesecake with plastic wrap and refrigerate for at least 4 hours, or overnight, to set properly. -
Serve:
Carefully release the springform pan. Slice and serve, optionally drizzling with additional melted marshmallows or chocolate.
What to Serve With Rice Krispie Treat Cheesecake
- Fresh Berries: Strawberries or raspberries add a pop of color and tartness.
- Chocolate Sauce: Drizzle over the top for an extra indulgent treat.
- Whipped Cream: Serve a dollop on the side for added creaminess.
- Coffee or Milk: Pair it with a warm beverage for balanced flavors.
- Great Occasions: Perfect for birthdays, potlucks, or casual family dinners.
Top Tips for Perfecting Rice Krispie Treat Cheesecake
- For a firmer base: Use slightly more Rice Krispies or reduce the marshmallows a bit.
- Spice it up: Add a pinch of cinnamon or nutmeg for warmth in the cheesecake filling.
- Substitutions: Use dairy-free cream cheese and whipped cream for a vegan option.
- Storage: Leftovers can be kept in the fridge for up to 5 days.
- Equipment: A springform pan is ideal for easy removal, but a regular pie dish works too!
Storing and Reheating Tips
- Refrigeration: Store the cheesecake covered in the fridge for up to 5 days.
- Freezing: Can be frozen for up to 2 months. Just make sure to wrap it tightly.
- Reheating: No need to reheat, as it’s best enjoyed chilled. Just slice directly from the fridge!
FAQs
Can I use regular marshmallows instead of mini marshmallows?
Yes, just cut them into smaller pieces before melting.
Can I prepare this cheesecake ahead of time?
Absolutely! It’s perfect to make a day in advance.
Is it possible to make this cheesecake gluten-free?
Yes! Just check that you use certified gluten-free Rice Krispies.
Can I substitute the cream cheese for something lighter?
Yes, you can use Greek yogurt for a lighter version, though the texture will change a bit.
How long does the cheesecake take to set?
It needs at least 4 hours in the fridge, but overnight is best for optimal firmness.
Conclusion
You’re going to love the combination of nostalgia and indulgence in this Rice Krispie Treat Cheesecake! It’s simple to make, fun to serve, and guaranteed to impress your family and friends. Try it tonight and let me know how it turned out!
#RiceKrispieTreatCheesecake #NoBakeDessert #FamilyFriendlyRecipes #DessertRecipes #SweetTreats
Rice Krispie Treat Cheesecake
A delightful no-bake cheesecake combining the nostalgic flavors of Rice Krispie treats with a creamy cheesecake filling, topped with a sweet marshmallow drizzle.
- Prep Time: 15 minutes
- Cook Time: 0 minutes
- Total Time: 240 minutes
- Yield: 8 servings 1x
- Category: Dessert
- Method: No-Bake
- Cuisine: American
- Diet: Vegetarian
Ingredients
- 2 cups Rice Krispies
- 1 cup mini marshmallows
- ½ cup unsalted butter
- 16 oz cream cheese
- 1 cup powdered sugar
- 1 tsp vanilla extract
- 1 cup whipped cream
Instructions
- In a saucepan over low heat, melt the butter. Add the mini marshmallows and stir until completely melted and smooth. Remove from heat and mix in the Rice Krispies until well coated.
- Lightly grease a 9-inch springform pan. Pour the Rice Krispie mixture into the pan and press down evenly. Set aside to cool.
- In a mixing bowl, beat the cream cheese until smooth. Gradually add the powdered sugar and continue mixing until combined. Stir in the vanilla extract.
- Gently fold the whipped cream into the cream cheese mixture until just combined.
- Pour the cheesecake filling over the cooled Rice Krispie base, smoothing the top with a spatula.
- Cover the cheesecake with plastic wrap and refrigerate for at least 4 hours, or overnight, to set properly.
- Carefully release the springform pan. Slice and serve, optionally drizzling with additional melted marshmallows or chocolate.
Notes
For a firmer base, use slightly more Rice Krispies. Can be made dairy-free using non-dairy substitutes.
Nutrition
- Serving Size: 1 slice
- Calories: 280
- Sugar: 25g
- Sodium: 200mg
- Fat: 15g
- Saturated Fat: 9g
- Unsaturated Fat: 6g
- Trans Fat: 0g
- Carbohydrates: 36g
- Fiber: 0g
- Protein: 3g
- Cholesterol: 30mg