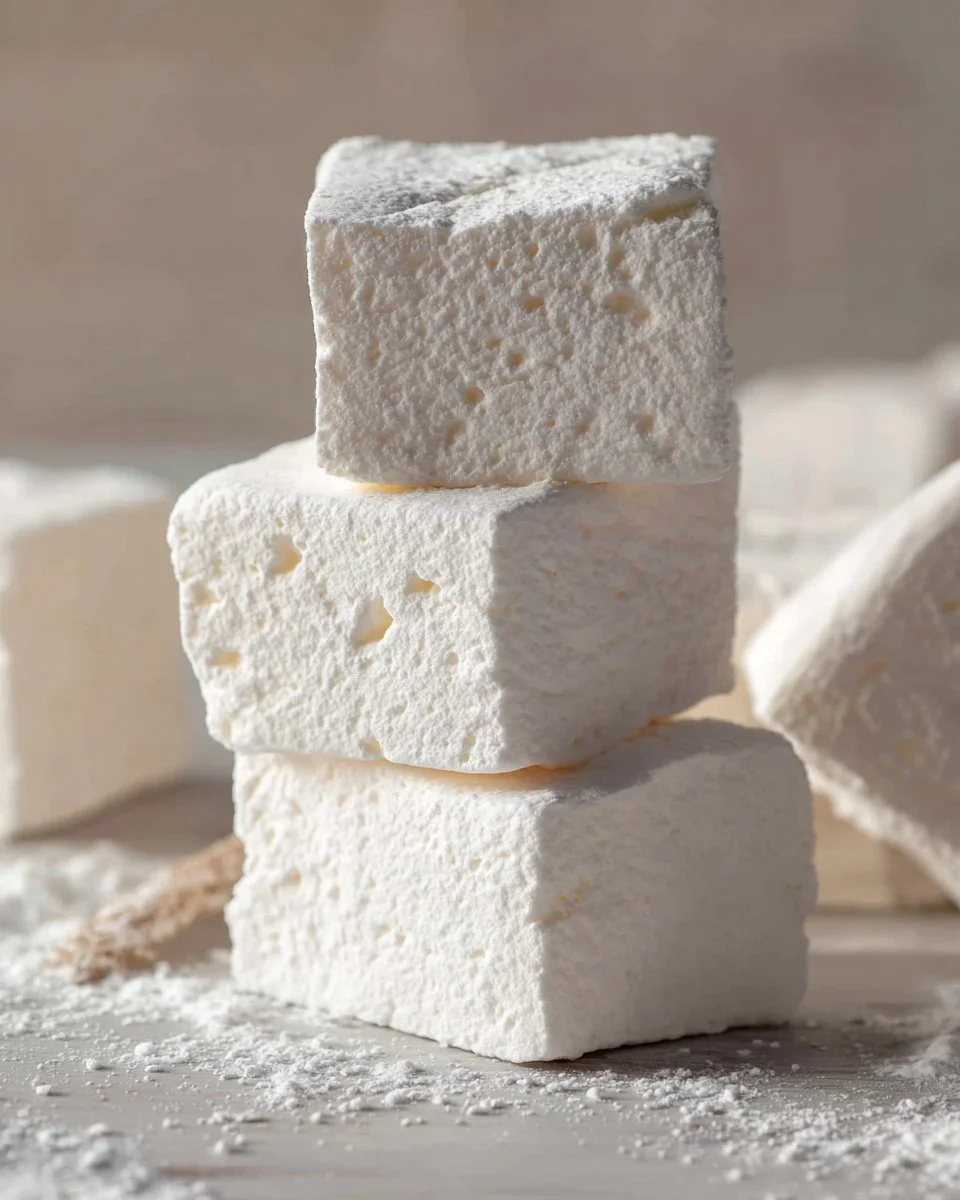
Homemade Marshmallows
There is something wonderfully nostalgic about a pillow-soft marshmallow you made yourself. These homemade marshmallows are pillowy and tender with a smooth, melt-in-your-mouth texture and a light vanilla aroma that fills the kitchen as they set. They are sweeter and more substantial than store-bought versions, with a glossy exterior and a delightfully chewy center. They are ideal for cozy nights by the fire, stirred into hot chocolate, or cut into squares for gifts and dessert trays. If you want a warm, rustic pairing, they go nicely with a slice of cornbread or a sweet snack, and you can explore different dessert pairings like cookies or crumbles for a simple, homemade treat. For an easy baked companion, try this best homemade cornbread recipe when serving warm marshmallows.
Ingredients
-
1/3 cup (40g) confectioners’ sugar
Lightly sweet powdered sugar used for dusting so marshmallows do not stick. -
3 Tablespoons (24g) cornstarch
Mixed with confectioners’ sugar to create a nonstick coating and a soft outer texture. -
3/4 ounce (21g) unflavored gelatin (3 standard 1/4-ounce packets)
The setting agent that gives marshmallows their structure and chew. -
1 cup (240ml) cold water, divided
Used partly to bloom the gelatin and partly to make the sugar syrup. -
1 cup (325g) light corn syrup
Adds sweetness and helps create a smooth, stable texture. -
1 and 1/2 cups (300g) granulated sugar
Main sweetener that dissolves into the syrup to give body and sweetness. -
1/4 teaspoon salt
Balances sweetness and enhances the vanilla flavor. -
1 Tablespoon pure vanilla extract
Provides the classic aroma and flavor of homemade marshmallows.
If you plan to offer cookies alongside these marshmallows, they pair well with a chewy sandwich like homemade nutter butters for a nostalgic plate of treats.
Step-by-step Instructions
-
Generously spray the bottom and sides of a 9×13-inch glass or ceramic baking pan with nonstick cooking spray. Dust the pan evenly with a mixture of the confectioners’ sugar and cornstarch. Reserve the remaining mixture for coating later. Tip: use a sifter or fine mesh strainer for an even dusting.
-
Place the gelatin and 1/2 cup of the cold water in the bowl of a stand mixer. Let the gelatin sit and bloom while you prepare the hot syrup. This softens the gelatin so it dissolves smoothly.
-
In a medium saucepan, combine the remaining 1/2 cup water, corn syrup, granulated sugar, and salt over medium heat. Stir until the sugar fully dissolves, then stop stirring and let the mixture cook until it reaches the soft ball stage, 235 to 240 degrees F. Tip: use a candy thermometer for accuracy.
-
Remove the pan from the heat and let it sit for 5 minutes to slightly cool. While the mixer runs on low speed, slowly pour the hot syrup into the bloomed gelatin in a thin, steady stream. Pouring slowly helps prevent splattering and ensures an even mixture.
-
Increase the mixer speed to high and whip the mixture until it becomes thick, glossy, and triple in volume, about 10 to 15 minutes. Add the vanilla extract in the last minute of whipping so the aroma stays bright. The mixture should be thick enough to hold peaks.
-
Pour the whipped marshmallow mixture into the prepared pan and smooth the top with an oiled spatula. Let the pan sit uncovered at room temperature for at least 6 hours, or until the marshmallows are firm to the touch. Do not cover while setting.
-
Once firm, dust a cutting board with the remaining confectioners’ sugar and cornstarch mixture. Invert the marshmallows onto the dusted board, peel away the pan liner if used, and cut into squares using a sharp knife or pizza cutter dusted with the sugar mixture. If desired, toss each square lightly in the remaining sugar mixture to coat the edges.
-
Store the finished marshmallows in an airtight container at room temperature for up to 2 weeks.
For a complementary dessert idea, try serving marshmallows alongside a warm crumble such as this homemade apple crumble recipe for a rustic, comforting plate.
Recipe Details
- Prep Time: 20 minutes
- Cook Time: 25 minutes active (syrup + whipping)
- Total Time: 6 hours 45 minutes (includes 6-hour setting time)
- Servings: about 48 1-inch squares
- Calories: approximately 60 kcal per serving
For a sweet sandwich treat, these marshmallows also work well with small cookies like homemade nutter butters, for a playful twist.
Tips, Storage & Variations
- Tip: Bloom the gelatin fully before adding hot syrup. If gelatin grains remain hard, the texture can be gritty.
- Tip: A candy thermometer makes reaching the soft ball stage reliable. If you do not have one, watch for a small amount of the syrup to form a soft, pliable ball when dropped into cold water.
- Storage: Keep marshmallows in a single layer in an airtight container at room temperature for up to 2 weeks. Avoid refrigerating, which can introduce moisture and make them sticky.
- Freezing: Marshmallows freeze well. Place squares in a single layer on a tray to flash-freeze, then transfer to a freezer-safe airtight container for up to 3 months. Thaw at room temperature before using.
- Variations using the same ingredients only:
- For a more pronounced vanilla aroma, add the full tablespoon of vanilla in two additions while whipping so the scent layers.
- For a softer exterior, use more of the reserved confectioners’ sugar and cornstarch mixture when dusting.
- For chewier marshmallows, whip to the longer end of the 10 to 15 minute range to increase volume and structure.
- Serving idea: top a warm crumble with a toasted marshmallow square for an indulgent texture contrast, using the same flavors found in this recipe and similar desserts such as the homemade apple crumble.

FAQ
Q: How long does it take for homemade marshmallows to set?
A: Plan for at least 6 hours at room temperature. Overnight is easiest.
Q: Can I make marshmallows without a stand mixer?
A: You can, but whipping by hand is difficult. A stand mixer gives the best texture.
Q: Why did my marshmallows turn out sticky?
A: Sticky marshmallows usually mean not enough dusting mixture was used or they were stored without an airtight seal.
Q: Do I need a candy thermometer?
A: It is highly recommended to reach the 235 to 240 degrees F soft ball stage accurately.
Q: Can I cut these into shapes?
A: Yes, invert onto a dusted board and cut with cookie cutters or a sharp knife after dusting them well.
Q: Are these gelatin marshmallows suitable for vegetarians?
A: No, the recipe uses unflavored gelatin, which is animal based.
People Also Ask
Q: What does light corn syrup do in marshmallows?
A: It helps prevent sugar crystallization and contributes to a smooth, stable texture.
Q: How do I prevent marshmallows from sticking to the pan?
A: Thoroughly coat the pan with nonstick spray and dust with the confectioners’ sugar and cornstarch mixture.
Q: Can I add color to these marshmallows?
A: If you have color on hand, add a few drops during whipping, but do not change the listed ingredients.
Q: How should I cut marshmallows without them tearing?
A: Dust your knife or cutter with the sugar mixture and use a single clean cut for each piece.
Q: Will humidity affect the recipe?
A: Yes, very humid days can make setting harder and increase stickiness. Use a dehumidified room if possible.
Q: Can I toast these marshmallows?
A: Yes, they toast beautifully over a low, even flame or with a kitchen torch.
Conclusion
I hope this Homemade Marshmallows recipe inspires you to make a batch of soft, fragrant marshmallows at home and share them with friends and family. If you want more tips and troubleshooting for marshmallow-making, this How To Make Homemade Marshmallows (Foolproof Guide) is a helpful companion to refine technique. For another tested recipe and variations, see How to Make Homemade Marshmallows – Sally’s Baking Addiction. Enjoy the cozy kitchen aroma and the simple joy of something homemade.
PrintHomemade Marshmallows
Deliciously fluffy and tender homemade marshmallows that are sweeter and more substantial than store-bought ones, perfect for cozy nights or gifting.
- Prep Time: 20 minutes
- Cook Time: 25 minutes
- Total Time: 405 minutes
- Yield: 48 servings 1x
- Category: Dessert
- Method: Baking
- Cuisine: American
- Diet: Vegetarian
Ingredients
- 1/3 cup (40g) confectioners’ sugar
- 3 tablespoons (24g) cornstarch
- 3/4 ounce (21g) unflavored gelatin (3 standard 1/4-ounce packets)
- 1 cup (240ml) cold water, divided
- 1 cup (325g) light corn syrup
- 1 and 1/2 cups (300g) granulated sugar
- 1/4 teaspoon salt
- 1 tablespoon pure vanilla extract
Instructions
- Generously spray the bottom and sides of a 9×13-inch glass or ceramic baking pan with nonstick cooking spray. Dust the pan evenly with a mixture of the confectioners’ sugar and cornstarch. Reserve the remaining mixture for coating later.
- Place the gelatin and 1/2 cup of the cold water in the bowl of a stand mixer. Let the gelatin sit and bloom while you prepare the hot syrup.
- In a medium saucepan, combine the remaining 1/2 cup water, corn syrup, granulated sugar, and salt over medium heat. Stir until the sugar fully dissolves, then stop stirring and let the mixture cook until it reaches the soft ball stage, 235 to 240 degrees F.
- Remove the pan from the heat and let it sit for 5 minutes to slightly cool. While the mixer runs on low speed, slowly pour the hot syrup into the bloomed gelatin in a thin, steady stream.
- Increase the mixer speed to high and whip the mixture until it becomes thick, glossy, and triple in volume, about 10 to 15 minutes. Add the vanilla extract in the last minute of whipping.
- Pour the whipped marshmallow mixture into the prepared pan and smooth the top with an oiled spatula. Let the pan sit uncovered at room temperature for at least 6 hours, or until the marshmallows are firm to the touch.
- Once firm, dust a cutting board with the remaining confectioners’ sugar and cornstarch mixture. Invert the marshmallows onto the dusted board and cut into squares.
- Store the finished marshmallows in an airtight container at room temperature for up to 2 weeks.
Notes
For a complementary dessert idea, try serving marshmallows alongside a warm crumble like homemade apple crumble.
Nutrition
- Serving Size: 1 square
- Calories: 60
- Sugar: 12g
- Sodium: 50mg
- Fat: 0g
- Saturated Fat: 0g
- Unsaturated Fat: 0g
- Trans Fat: 0g
- Carbohydrates: 14g
- Fiber: 0g
- Protein: 0g
- Cholesterol: 0mg